Today I prepared for my first cross country flight. Before students start going on cross country training flights, they first must understand what they’re doing. It would be pointless flying to a different airport if the student didn’t know how they got there or what the procedures were for cross country flight. Today, my instructor showed me what I need to do prior to the flight, in order to get ready for a cross country flight lesson
Pilotage and Dead Recogning
First off, there are many ways which pilots navigate the skies. A common, well know method is by GPS. GPS has become standard in all new built aircraft. However, plane which were built in the 1960s are still being flown all over the country today. While some pilots spend money to have GPS systems installed on older aircraft, most planes from decades ago must rely on other means of navigation. During VFR flight, the standard way to navigate is by pilotage and dead recogning. Pilotage is the process of navigating by visual references on the ground. For example, a pilot flies until he sees a point which can be seen on his map. This can be a building, a road, bridge, or anything distinguishable. Once the pilot locates the object on his chart, he knows where he is. Then, he’ll fly in the direction of another known marker and continue to do so until he reaches his destination. Dead recogning is the process of adding math to pilotage. By knowing speed, altitude, winds, and distances, pilots can know when they will be over a known location at the precise moment they reach it. Dead recogning is how private pilots are trained at Farmingdale Aerospace, along with student pilots all over the country.
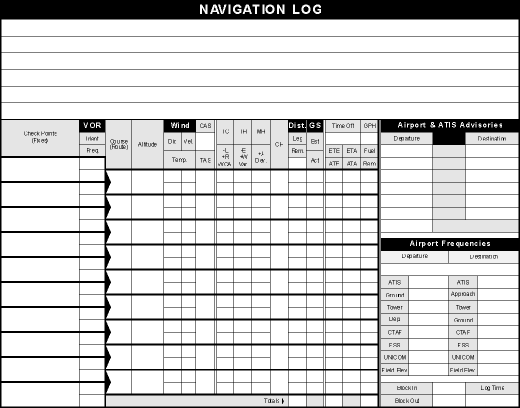
Navigation Log
All time, distance, fuel, altitude and other pertinent information is recorded on a navigation log. The first thing on the log is an area where the pilot can write down waypoints. This can be anything from an airport or VOR to a bridge, intersection of roads, or buildings. Almost anything can be used as a waypoint, as long as it’s clearly visible from the desired altitude and if it sticks out from its’ surroundings. The goal is to get from one airport to another as directly as possible. It’s advantageous to pick waypoints which make the most direct line possible between the two airports. Of course, the majority of the time, the flight won’t be straight and will “zig zag” a bit.
During my lesson today, I filled out a mock navigation log, which would have taken me from Republic Airport to Dutches County Airport in Poughkeepsie, NY. Including the starting and ending airports, I had 7 total waypoints. Once I decided on suitable waypoints, I measured the distance in, NM, from waypoint to waypoint. Because winds play a vital role on timing and correction angles, you need to compensate for wind when determining the true course from one waypoint to the other. It’s also important to note that when planning for winds, pilots must use the winds aloft data, and not surface winds. Once winds correction angles had been established, I then compensated for variation. Variation is the angular difference between geographical North Pole and the magnetic north pole. In my area of New York, the variation is about 14°W; so I add 14 to my true course (east is least, west is best). Next was magnetic heading. This is the final heading
| |
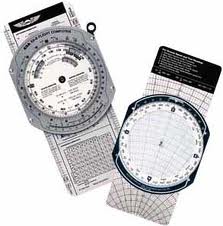
which the nose of the plane should be pointed in order to arrive at the desired waypoint. In order to get this, I had to add or subtract deviation. Deviation is the error in the heading indicator due to the magnetic and electrical fields inside the plane (often caused by the instruments, GPS, cell phones etc.). Normally, there isn’t more than 1 or 2 degree deviation for each radial. Any wind, time, fuel and distance can be calculated by using a “Whiz Wheel.” A Whiz Wheel (above) is a flight computer; one side has a tool which allows for wind angle correct, while the other side has two turnable wheels for computations.
Once the magnetic heading was established, I needed to find out fuel consumption. In order to do this, I needed to know how much fuel the airplane would burn. Luckily, that information’s provided in the aircraft’s POH. Because I know what my speed will be, and the distances between waypoints, I can calculate exactly what time I should be at each way point. Also, because I know the distance and the fuel consumption rate, I can calculate the amount, in either pounds or gallons of fuel the trip will need.
The last section on the navigation log is for additional information. There are spots to write down both the departure and the destination airports’ frequencies; tower, ground, ATIS, FSS, and any other frequencies, which are important.
Once completed, the pilot then needs to call the appropriate flight service station to open the flight plan. This means that the pilot puts his trip on record. Once airborne, or just prior to takeoff, the pilot will open the flight plan so the flight service station knows the plan is active. Once the trip has been completed and the destination airport is reached, the pilot must close the flight plan. If not closed, the FSS will issue a search and rescue operation after 15 minutes of expected time of arrival at the destination airport. Because today was practice, I didn’t open the flight plan. However, it was good practice for my first cross country flight next week.
The past couple of days, here in the New York metropolitan area, have seen cloudy skies, rain, and overall poor weather. The majority of the time, IFR rules have been in effect. There are two types of flights, and flight plans, which pilots can file; Visual Flight Rules and Instrument Flight rules. It’s important to know the difference between the two. In order for your better understanding, this post will describe what each is and the importance of both.
Stable Vs. Unstable air
First off, most people associate clear skies, warm weather, and clean air as good weather for flying. This isn’t entirely true. While clear skies are positive to flying, they usually indicate unstable air. Unstable air is described as air with the tendency to rise vertically; which can be associated with cumulus clouds, good visibility, showery precipitation and turbulence. Therefore when one looks up and sees bright blue skies, it usually means planes in the air are experiences some degree of turbulence. On the other hand, stable air is much more conducive to peaceful flight. However, in order for air to be stable, air must be the opposite of that which describes unstable air. Stable air does not rise vertically and is associated with stratiform (or layered looking) clouds, poor visibility, steady precipitation, and no turbulence. When you go outside on a day where it’s overcast and has been raining constantly for an extended period of time, the planes in the air feel little turbulence. Unfortunately, they are flying in the clouds and can’t see anything.
 Visual Flight Rules
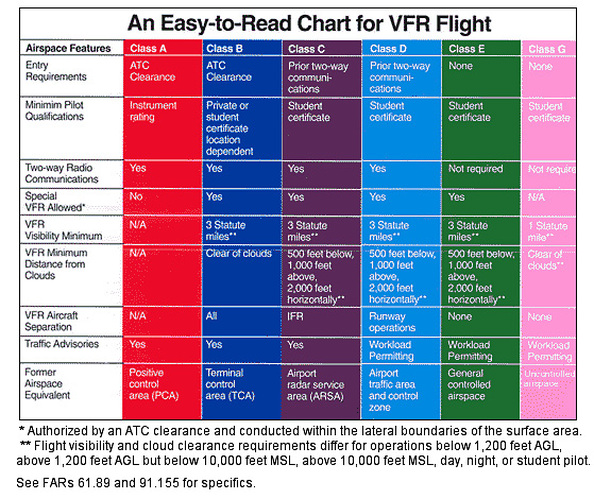
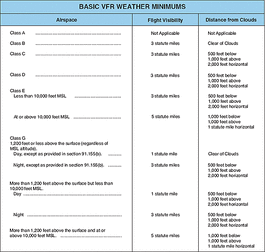
This brings the discussion to VFR vs. IFR flight. In order to fly VFR, pilots must “play” by certain rules. The FAA defines visual flight rules as “The pilot must be able to operate the aircraft with visual reference to the ground, and by visually avoiding obstructions and other aircraft.” Basically, they rely on sight to fly the plane. The weather minimums, described in the FARs sec. 91.155 state: (a) Except as provided in paragraph (b) of this section and §91.157, no person may operate an aircraft under VFR when the flight visibility is less, or at a distance from clouds that is less, than that prescribed for the corresponding altitude and class of airspace in the following table. The chart to the left (click to enlarge) describes what each airspace’s limitations are for VFR. Because each airspace has its’ own level of air traffic, VFR rules are different for each. If, while flying in the appropriate airspace, a pilot cannot maintain these weather minimums, than he or she will have to file an IFR flight plan, or change course or altitude to stay in VFR flight.
Instrument Flight Rules
If weather falls below these minimums, than a pilot must file an IFR flight plan, prior to departure. The FAA defines IFR flight as “Rules and regulations established by the FAA to govern flight under conditions in which flight by outside visual reference is not safe. IFR flight depends upon flying by reference to instruments in the flight deck, and navigation is accomplished by reference to electronic signals.” This means that if conditions exist below the weather minimums, IFR flights must be flown by reference to the flight instruments, and by electronic signals from the ground, or controlling agencies; tower or ARTCC. The FARs state in sec. 91.167 what the requirements for IFR flights are.
 Pilots who have not yet received an instrument rating are not permitted to fly IFR. In order to do so, the student pilot must first obtain a private pilot license, then enroll and earn an instrument rating. This course teaches student pilots the operations of instrument flying.
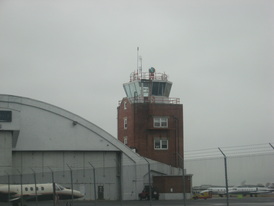
The picture to the left (click to enlarge) shows the former control tower at my base airport, Republic – KFRG. (A new tower on the other side of the field controls all flight activity; however, this tower was used decades ago.) Every towered airport has a rotating beacon, and Republic’s is atop the old tower. The beacon rotates at night, and also during IFR conditions. Also, the rotating beacon identifies which type of airport it’s on. If a beacon flashes a white light, followed by a green light, (you can see in the picture the green light is flashing by) the airport is a land, civil airport. If there is a while signal followed by two green flashes, the airport is a land military airport. When the beacon flashes a white, then yellow light, it’s a sea port; and if the beacon flashes white, green then yellow, the beacon’s located on a helipad.
Knowing the difference between VFR and IFR is important for pilots. Pilots who don’t follow the proper rules are subjected to license revocation, fine, or another form of punishment by the Federal Aviation Administration
So this “winter storm” has grounded most students from flying today, even without any snow. VFR flight, or visual flight rules, dictates whether or not certain students can fly. It all depends on the training. For a student like me, I cannot fly on a day like this. Unless the ceiling (lowest layer of broken or overcast clouds) is above 3000 feet and visibility is 5 SM or more, I’m grounded. However, when I become an instrument student (learning to fly in clouds, and bad weather) I can go out in a day like this.
While flying VFR, pilots must follow rules on ceiling, and visibility, as well as how far away they are to stay from the clouds. Each airspace has its own rules. The chart below does a good job to illustrate the visual flight rules in the different types of airspace.
Skies clear. Wind at 6 knots from 320°. Altimeter at 29.95”. Temperature is 14°C/ 58°F. Pretty much a perfect day to fly. I got to the flight center 30 minutes early to give myself enough time to get the weather, ATIS, figure out landing and takeoff distance, and determine the weight and balance for the airplane. Today’s lesson was going to be a fun one. We would start by taking off runway 32, and travel north to the north practice grounds. After doing a few stall recoveries, I was going to go up to Bridgeport Airport to practice touch and goes there. I had never been to Bridgeport and was excited to visit a new place. After all, that’s what flying is all about, traveling. However, I never made it to Bridgeport. I didn’t make it to the practice field. I didn’t even make it off the ground.
After I got all the information I went out to the plane to inspect the plane and make sure everything was good. As I went through the checklists, I made sure every item was correct, as I usually do. First the cockpit checklist, then the right wing followed by the forward fuselage. Next was the left wing and finally rear fuselage. After all that I did a complete 360° walk around and was confident the plane was all set. I went back into the cockpit and got ready for the flight. As I waited for my instructor to come out, I opened the aviation map to the places I would be at, and got the frequencies I would need for the new airport I was going to.
My instructor finally came out checked the airplane himself to make sure I didn’t forget anything and he hopped in the plane as well. I diligently went through the pre engine start checklist:
Seats/seatbelts- on
Fuel selector- switch
Flaps- set 0
Circuit breakers- set in
Electrical switches- off
Mixture- full forward
Throttle- open 1/4th
Panel lights- as required
Checklist complete
Time to start the engine:
Battery master switch- on
Alternator- on
Fuel pump- on
Prime- 3 seconds
Prop area- cleared
Starter- engage
As the engine roared alive, I finished the first few checklists and got ready to taxi. I collected the weather, checked my brakes, and turned on all the lights. I radioed to the company’s frequency that I was outbound and made my way for the runway. After calling up ground control, I got a clearance to taxi to runway 32 via alpha, cross runway 1, to alpha run up area.
In the run-up area, I pulled the plane into the box, set the parking brake and went through the before takeoff checklist
Flight controls- free correct
Directional gyro- set to magnetic compass
Stabilator trim- neutral
Flaps- set 0
Windows/doors- locked
Seatbelt- on
Set throttle to 2000 rpm- set
Check magnetos- FAILED
As I was doing the before takeoff checklist, I went to check the magnetos. As I turned the key to the left magneto, I read a 150 rpm drop. Normal. I turned it back to both then to the right magneto. As I did so, the engine’s rpm started fluctuating uncontrollably. Magnetos are supposed to make the engine rpms drop no more than 175, but in this case, the rpms dropped well over 500 rpms. A problem. My instructor didn’t expect me to be able to fix the problem or know what to do so he helped me out. We idled in the run-up area and waited a few minutes to try it again. After trying it again, the same thing happened. The rpms dropped about 600 this time. My instructor called state ops and told them we were inbound in an aircraft with a faulty left magneto. My day was over.
 A common airplane magneto. A magneto is a device inside the engine cowling which is responsible for starting the aircraft’s engine. The planes I use have two magnetos. This is for system redundancy, as well as for increased performance. With one magneto, the engine could get up to 2500 rpms, for example. However with 2, the rpms could go up to 2700 rpms. However, each one can produce 2500 rpms. So with 2, there’s added power, but not double power. A magneto is an electrical generator that uses permanent magnets to produce alternating current. This means that no power is needed to fire the magnetos because they operate on magnetism. So if there were to be an electrical failure in flight, the engine would still be able to run. The magnetos send an electric current to the spark plugs, in the cylinders, which ignite the fuel/air mixture which burns, turns the crankshaft, which turns the propeller. The turning propeller produces thrust and the plane moves through the air. So when I did the right magneto check earlier today, it dropped more than 175 rpms. This means that the right magneto wasn’t functioning properly and needed to be looked at.
A good lesson, but at the cost of a flight lesson. Luckily I didn’t get charged for the time I was in the airplane.
Today was the first time I flew the simulator. The flight school has a large room with flight simulators in them for the students to use. There are pros and cons with using the sims. First off, using the sim as a lesson is much cheaper than a plane. There’s no fuel, and landing fees. Another pro is that there’s no danger, like when flying an airplane. However, the feel of using the sim is not even close to the feel of a real airplane. While piloting the sim, there is pressure on the yolk, like in a real plane, but it is infrequent and can’t be relied on to know what the plane wants to do. The instruments are extremely sensitive also, which makes it hard to stay on a specific heading and altitude for an extended period of time. What the simulator is good for is what I did today; practicing VOR navigation.
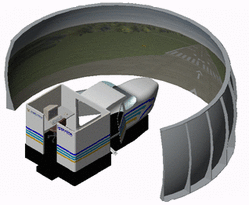
Computer image of what the simulator looks like.
VOR navigation is a way to know where you’re going, while flying. Simply put, VORs are stations on the ground, which emit a signal in all directions. The signal is picked up by the transponder in the airplane and displays data in the cockpit. Basically, the plane will track a signal from the VOR. Then the pilot can fly on a specified heading to or away from the VOR station, and know where he or she is.
I was using the largest and most expensive simulator today. There’s a real sized cockpit in the room with a 180 degree screen in front of it which displays a picture of what I would see if I was actually flying outside. All geographical landmarks, airports, VORs, and other navigation aids are 100% accurate in the simulator, compared to reality.
When the sim turned on, I was already lined up with the runway. Instructors don’t really care about taxiing and contacting tower while using the sim. I used the throttle to accelerate, and took off, trying to maintain what I would do in a real flight. (climb out at Vy, and keep a heading of the centerline) When I got to 2000 feet I leveled off as best as I could, and assessed my flight so far
First, my instructor told me how to use the GPS to find the nearest VORs to me. I found the closest one, deer park, and noted the frequency. With my instructor’s help, I put in the frequency, and listened to the Morse code. After confirming the Morse code signal, I turned the needle on the VOR instrument in the cockpit, until it was lined up with the center line. If the line moves left or right, that means I’m off course. From turning the CDI knob, I read a heading of 165. I flew this course and eventually intersected the course I needed to fly in order to get to the VOR. Unfortunately, I still need more practice using VORs. My instructor had to help me a lot while flying. I practiced tuning to 2 more VORs before trying to figure out the GPS
The GPS is much simpler to use, and contains more information. The GPS has many functions, but one of them is that a pilot can use it just like a VOR. The only difference is that the VOR is digitally displayed on the GPS interface instead of on an analogue dial. Another function of the GPS is that it can tune into more than just VOR signals, or stations. There is a database pre-programmed into the GPS system that has a lot of waypoints that the GPS can also tune into. The advantage of this is that the GPS isn’t limited to what it can identify. Instead of tuning into a VOR’s signal, we tuned into Republic airport’s signal. The GPS automatically identified the station and displayed a direct route to the field. Because I was in a simulator, airspace was no factor. (no factor is a term used in aviation which means it doesn’t matter. For example, often while on final approach over 3 miles out, the tower will tell me that another plane is going to be taking off before I land. After the airplane on the ground takes off, the tower will radio to me and say that the traffic is no factor; meaning the taking off airplane doesn’t pose a problem to my landing)I made an ok landing, not bad for a simulation, and turned the machine off. Hopefully next lesson, in two days, I’ll be able to fly a real airplane and practice VOR navigation.
_ Today was a ground day. The next major part of my flight training is cross country trips. However, in order to do this, I need to learn a lot of things I haven’t yet learned. I can’t just hop in a plane and go to some airport 100 miles (Nautical) away. Something I don’t know yet is how to open and close a flight plan. In fact, I didn’t even know how to fill out a flight plan, or what it looked like before today. Basically, a flight plan is opened when a pilot starts a leg of a trip. The length of the trip is irrelevant. I can open a flight plan for a trip off only 20 miles if I wanted to. In order to make sure pilots are where they’re supposed to be at the correct time, or close to it, flight plans are submitted to an FSS (flight service station). These let the FSS know where, when, what plane, cargo, and any other important things about the flight they would need to know. Upon reaching the destination, the pilot closes the flight plan to affirm his arrival at the destined airport. If a flight plan is not closed within a certain amount of time of the expected arrival, a search and rescue operation is dispatched.
Another thing I learned today, which I only had limited knowledge of prior to today’s lesson, was VOR navigation. VOR stands for VHF (very high frequency) Omni-directional Radial. A VOR is a station on the ground which emits signals in all directions (360. However, it’s more like infinite directions, since there can be decimals of degrees of a circle. ) and a plane flying in the air can tune in to the signal. Based on the time it takes the signal to get to the plane and back, the VOR and plane know where it is in relation to the station. VORs help pilots travel from one VOR to the next, in order to get to a destination without getting lost.
VORs are complicated (or at least too complicated for a blog post) and need practice using. I haven’t ever used the VOR in the plane while in flight, so I need to get practice first. This is why my next “flight” will be in the simulator we have at the flight center.
Something I’m still concerned, or uncertain about, is what happens when I get to the airport I’m traveling to? How am I going to know where to get fuel, or where I’m allowed to park my plane? I’m excited to get started on my cross countries. My instructor describes it as real flying. No one gets on airplanes to fly around for a little and land at the same airport. They want to go places. Cross country flying will get me ready for the rest of my career.
Finally! Today was the first day of classes for the spring semester. Along with classes which meet on the campus, I’ll be flying on Mondays, Wednesday, and Fridays at 12:15 pm to 2:30 pm (1215 to 1530 or 1715 to 1930 zulu time). Unfortunately, I wasn’t able to fly today. The weather was below the VFR minimums for student pilots (3 SM visibility and 1000 feet ceiling) so I had the chance to brush up on flying. I haven’t flown in about 5 weeks and some of the information has slipped my mind. I ended the last semester by doing two solo flights and leaving it at that since my flight debit account ran out of money. This semester, I have a new flight instructor, whom I met with today, and went over key aeronautical points. Because he is a new instructor, he cannot just let me go out on a solos. He has to endorse me that I’m ready to solo because, previously, my old instructor endorsed me. Since the new guy hasn’t seen me fly yet he’ll have to make sure, himself, that I’m ready to go. To do this, we went over the written test I took for the Stage I check ride. I had gotten a 95% on the test, but we still went over each answer to make sure I knew what was on it. I did well, only needing help on one or two questions, and my new instructor, Drew, said that all we need to do now is fly so I can show him my skill level. I want to fly twice before soloing again, but if all goes well without first flight, I’ll solo after that. After we went over the test, and reviewed a few more things, I had to update the documents which expired while I wasn’t flying. One of the things I needed was the new FAR-AIM (federal Aviation Regulations – Aeronautical Information Manual). This book comes out every year on New Year ’s Day and is updated with changes from the past year’s edition. Generally, only a few changes are made, and the ‘meat’ of the information contained in the book stays the same. More information HERE about the FAR-AIM. Another thing I had to get was the new aeronautical charts. These come out every few months for the same reason as a new FAR-AIM. Changes are made to the charts from the old ones. Changes could include the demolition of a building, or a new building, changes to airspace, or airport information. It’s illegal to fly with outdated charts so getting the newest ones is something all pilots must be on top of. Another document which I could have gotten was the Airport/ Facility Directory, or the A/FD. This book contains information about all the airports in the specific region. For me, it would be the northeast region of the United States; with a total of 8 regions. I decided not to get this yet since I won’t be needed it until later in the semester. Hopefully Wednesday will come with better weather and I’ll be set to take to the skies once again.
One of the first things which made me feel “cool” to be flying airplanes was using the phonetic alphabet. In aviation, the phonetic alphabet is the method used in order to speak different letters without causing confusion. For example, when saying the letter ‘D’ out loud, it can be misunderstood as ‘B.’ To cancel out the confusion, pilots, controllers, and people within the aviation industry use whole words for each letter of the alphabet. So to make sure ‘D’ and ‘B’ don’t get confused, we say Delta and Bravo. All 26 letters each have their own word, which doesn’t take a long time to memorize. Even when giving the tower or ground control an entire flight plan, each letter of each word must be said with its’ corresponding phonetic word. This causes a flight plan to take some time to open, but also makes it safer in that no confusion will occur.
The first time I experienced using the phonetic alphabet was on the very first lesson of flight training. I didn’t get to fly that day, but I was shown how to fill out departure paperwork. The first thing to write down on the paperwork is the tail number of the plane. At Farmingdale Aerospace, the Piper Warriors are numbered from 148 through 159 and have LH at the end. Each airplane registered in the United States always starts with an N. So when I use N153LH, I have to contact ground and tell them that “153 Lima Hotel” is ready to taxi. Because we’re operating in the United States, with a US registered airplane, the N, or November, isn’t necessary to say.
The phonetic alphabet is as follows:
A- Alpha
B- Bravo
C- Charlie
D- Delta
E- Echo
F- Foxtrot
G- Golf
H- Hotel
I- India
J- Juliet
K- Kilo
L- Lima
M- Mike
N- November
O- Oscar
P- Papa
Q- Quebec
R- Romeo
S- Sierra
T- Tango
U- Uniform
V- Vector
W- Whisky
X- X-ray
Y- Yankee
Z- Zulu
Anything from airplane tail numbers, airport identifiers (Republic is KFRG or Kilo Foxtrot Romeo Golf), taxiways, and ramp locations are designated with a letter of the alphabet. The name however, of any of these things is named after the appropriate phonetic alphabet letter. So when I leave the ramp which Farmingdale keeps its planes, I usually say something like “Farmingdale state 153 Lima Hotel is at Echo (we’re located on ramp E) with information Charlie (the name of the hourly weather report) ready to taxi to Golf (the closest taxiway to the Echo ramp).” At that point the ground control tells me what to do and where to go.
Learning the phonetic alphabet is just one of the small, but largely important, aspects of learning how the aviation industry works.
Luckily, more than 75% of my working life has been lifeguarding at both the beach and pools. Through lifeguarding, I’ve learned about hypoxia, a deficiency of oxygen on the blood stream. Our atmosphere is made up of, generally, 80% nitrogen, 19% oxygen and 1% other gasses. When flying at increasing altitudes, the air becomes thinner, which means we breathe in less oxygen. The higher a plane goes, the less oxygen is available for the body to use. While flying at these higher altitudes, people sometimes experience hypoxia, which, as stated before, is a deficiency of oxygen in the blood stream. Student pilots learn what the effects of oxygen are and what the regulations are which can prevent hypoxia. There are five different types of hypoxia, but private pilots only have to know about the general form of hypoxia. When I get into instrument and commercial classes, I’ll learn what the different types are. There are many different symptoms of hypoxia, which include headaches, fatigue, shortness of breath, nausea, and a feeling of euphoria. During the class where hypoxia was explained, we learned how cyanosis, a blue coloration of the skin, is also a tell tale sign of hypoxia. However for the purpose of this post, I won’t go into the detail of the hemoglobin and red blood cell distribution. Either way, it’s important to know about the signs and symptoms of hypoxia. An oxygen supply is a method which the FAA regulations suggest in order to combat the effects of hypoxia at higher altitudes. There are recommendations by the federal aviation regulations, and then there are actual regulations. The recommendations are that during night flight, oxygen should be provided when flying at or above 5,000 feet. During daytime flying, oxygen is recommended to be available while flying at or above 10,000 feet. This rule of thumb is different from the actual regulations about oxygen on board an airplane. The official regulations on supplemental oxygen can be found here at FAR 91.211. Basically they state that an airplane must be equipped with a 30 minute oxygen supply when traveling between 12,500 and 14,000 feet. If flying at or above 15,000 feet, oxygen must be provided for every person onboard the plane. This means that crew and passengers must be offered and have access to oxygen at or above 15,000 feet, but do not necessarily need to use it. Hypoxia is a topic which I wasn’t expecting to learn about, but in hindsight, it makes sense that pilots need to know about oxygen deficiency.
Something that took me off guard, is the process of going through checklists and looking at the aeronautical charts while flying. The charts, or maps, are published every six months to ensure that they are current. It would be unfortunate for a pilot to fly to an unknown area and look for a building that has since been destroyed. There are three types of maps, a TAC (terminal aeronautical chart) a SAC (sectional aeronautical chart) and a WAC (world aeronautical chart). The purpose of three is the amount of detail each has. The WAC is used for long travel and has a ratio of 1:1,000,000, or 1 inch to about 14 nautical miles. The SAC shows a bit more detail and covers a smaller area. The ratio for a SAC is 1:500,000 and 50 of them cover the US. Lastly, the TAC shows the most detail and covers the smallest area. The ratio of 1:250,000 allow the TAC to be used in the most heavily populated area. Unlike the WAC and SAC, not every part of the United States is covered by a TAC; only the most urban areas use a TAC. Examples are New York City, Los Angeles, Dallas Fort Worth, Memphis, Atlanta, and Miami. Aeronautical charts can be a lifeline for pilots. There are numerous invaluable pieces of information on the charts, which pilots can use to navigate to a safe place during an emergency. On the TAC and SAC charts, each airport is defined and has information about it, such as its’ frequencies, the type of fuel available at the airport, the length of the runways, where the airspace starts and ends, and even what type of lighting is used at the airport. It’s important, that pilots carry current charts with them while flying, and it’s even illegal if they do not. Checklists were something that took me some time to get use to. Flying isn’t exactly what Tom cruise and Leslie Nielsen make it out to be. Pilots don’t simply get into their planes, light the fires, and takeoff. Depending on the aircraft, there are many things which need to be done and checked prior to even getting into the cockpit. For planes like the USAF’s F-22, there are over 300 individual points on the exterior of the plane which need to be checked before the pilot can hop in and start going over the start up procedure. For the plane I train in, the Piper Warrior, there is a walk around process of checking fuel quality, tire pressure, and removal of frost, among other things. Once in the plane, we go through the pre start checklist which is comprised of 20 items. When the plane’s ready for engine start, another checklist is used for that, which has 15 items on it. There is a checklist for almost everything done in an airplane. From taxiing, to the takeoff roll, the pilot goes through checklists to ensure safety. While in the air, pilots go through checklists when they want to climb, descend, change course, and perform maneuvers. The expression “kick the tires and light the fires” comes from aviation. It means a pilot does a poor pre takeoff check of the airplane by simply kicking the tires to make sure they’re ok, then lighting the fires, or engine, in order to start flying quickly. The main problem I had with the checklists is that I just forgot to do them. I was so concentrated on climbing away from the airport at the right speed and angle, that I forgot the 1000 foot checklist, also called the climb checklist.
|